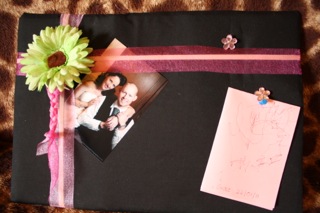
Back to school is a busy time of year and there are always thousands of pieces of paper! I got this idea from a craft website and not only is it practical for hanging photos, school notices, or maybe important dates, it is made from materials that a lot of people already have at home therefore very cost effective.So get the kids involved and have a go at creating your own personal bulletin board.
Materials:
- cardboard backing from a paper pad or cardboard from an old cereal box cut to desired size (we used 43cm x 30cm)
Gather your materials - piece of corrugated cardboard (cardboard box) cut 43cm x30cm
- 10 pieces of newspaper or so
- 2 pieces of plain white paper
- 1 piece of material slightly bigger than the card (you could use an old t-shirt or just some material laying around)
- Ribbon — we used old ribbon from Christmas presents
- string or wool
- crafting glue gun (adults should help) OR safety pins
- push pins
- tape
Optional: some sort of decorations- for example:
Special buttons or pins.
- Artificial flowers/embellishments
- Extra Large Rubber Bands
- Any other personal touches
Cardboard box cut up
Method:
STEP 1:
- Take the cardboard back off a paper pad or cut a piece of cereal box to 43 x 30cm.
- Cut the piece of corrugated cardboard from a box to 43 x 30cm. This might require a bit of help from a grownup.
Layering the pieces - Cut the pieces of newspaper to 43 x 30cm. You need about 20 of them (give or take).
- Make a stack of all your materials in this order:
- o paper pad backing (or cereal box)
- o corrugated cardboard
- o newspaper sheets
- o 2 pieces of white paper (so the newsprint doesn’t show through the fabric.

STEP 2
- Cut the fabric you’ve chosen (old pillow cases, t-shirts, sheets, etc all work well) to about 50 x 40cm
- Put the material on top of your stack and flip the whole thing over.
- Hot glue the material to the cardboard, pulling tight (we couldn’t source a hot glue gun nearby so used an industrial strength glue and some masking tape to holdin place).
- Cut two pieces of ribbon, so they wrap under the bulletin board.
STEP 3
- Tie at end or tape at back. We also wrapped two extra large rubber bands going opposite directions and putribbon over top so any pictures etc would stay on the board better.
- Pin or glue your chosen decorations to the board
- Hot glue (or tie to safety pins) a piece of string so you can hang your board
And there you have it! A great bulletin board to help get you through the year. You could put it up in the kitchen or make one for each of the kids for their bedrooms. Happy organising!


