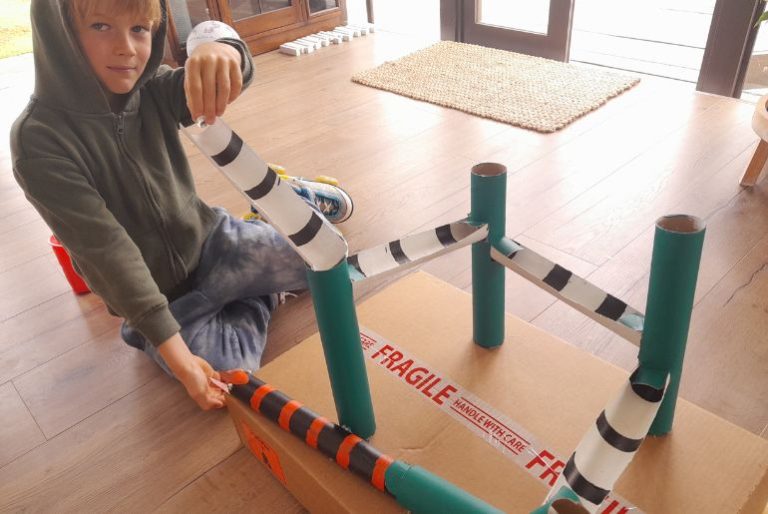
This is a super-fun and engaging activity to do with your kids as a weekend project. I think you’ll really like building this marble run from cardboard rolls! We spent a whole afternoon painting, gluing and then playing with this snake-inspired, cardboard roll marble run.
This is a great way to recycle those kitchen paper towel cardboard rolls. But more importantly it gives you a great excuse to spend some quality time with your kids. This is definitely a two-person project!
Making marble runs is a great way to develop fine motor skills, encourage creativity and problem-solving skills, and teach kids about gravity and motion.
There’s a fair bit of cutting and assembling required, so it’s a really good project for learning to work together too. I used a craft knife to cut out the windows, so that’s something grown ups will need to do. But my 8 year old got involved in all the other steps, even cutting out the ramps!
Older children will be able to make these on their own, and even design their own versions. But it’s still useful to have an extra pair of hands, to hold the towers while gluing, and to hold and adjust the ramps before gluing.
And, creative skill-building aside, it’s just a really cool way to watch your kids’ eyes light up as they see their marbles roll down the ramps and through the tunnels.
Cardboard Roll Marble Run – Snake Inspired
You will need
At least 7 cardboard rolls, or more to go big (kitchen paper towel rolls work well)
Scissors or craft knife
Hot glue gun and glue
Resene test pot paints in Deep Sea, Black, White and Grenadier
Washi tape
Large cardboard box (or some other board you can glue the towers to)
Marbles
Googly eyes and a little card for the tongue
What to do
1. Paint 4 of the rolls in Resene Grenadier. Cut one of these rolls in half.
2. Paint 2 of the rolls with two coats of Resene White.
3. Paint 1 of the rolls with two coats of black. Once the roll is dry use the Washi tape to tape off stripes and paint on Resene Grenadier stripes.
4. Cut the two white rolls in half lengthwise using the scissors. Then paint the inside of these rolls with two coats of white. Once this is dry, use the Washi tape to tape off stripes then paint the stripes using Resene Black.
5. Work out where the first ramp will fit between two of the green towers. Then cut two ‘windows’ out for the ramp to slot into. Make the first horizontal cut as wide as the ramp, then make 2 more vertical cuts for the sides of the window, but leave the top intact. You can push the tab you created inside the tower, but we left ours open upward, as we quite liked the effect. You want the ramps to fit into the windows quite snuggly.
6. Drop a marble into the top of the tower and test that it falls in, rolls down the ramp, then drops down the second tower. You’ll find the ramp needs to be pushed right inside the first tower to catch the marble, and left just inside the second tower to allow it to drop.
Once you’re happy with the roll, hot glue the ramp to the two towers.
Now work out where the next ramp will insert into the second tower, and then fall to the third tower. Follow the exact steps above to attach the second ramp.
Repeat the steps again for the third ramp. It will attach to the half tower toward the bottom.
7. At this point you’ll find the whole structure is getting a little unstable, and you’ll need to glue it to the base. Do this by hot gluing all the towers to the cardboard box. Remember to test a marble before you glue.
8. Once dried, you can glue the last ramp at the start of the marble run. Angle this into the first tower, then glue all around the ramp. You can also insert the other half of the cut green tower to make a tunnel, and glue this to the base. Then insert the orange and black roll in to extend the tunnel to the end of the marble run. Again, test before you glue.
9. Finally, glue on some googly eyes and cut out and paint a tongue in Grenadier, and glue this on to the orange and black snake.
Now grab some marbles, and start rolling! Check out hundreds more craft and toy projects in our School age: Creative arts and crafts section.


