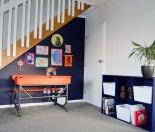
The humble pallet has to be the most forgiving, and most fun material to work with. I’ve always wanted a really raw, and rustic looking, pallet table in our lounge, which I’ve just finished. I thought I’d share with you my DIY pallet coffee table with planter box project.
I’ve been thinking about this project for some time, sort of waiting for inspiration, when a friend of ours showed up with about 8 different pallets one day. As they took up a fair amount of room in the garage, it was time to stop thinking, and start creating!
Basically my vision was a super-bright, super-glossy, low-lying coffee table with a planter in it. I also wanted it to be easy to make, and not to have to break down 5 pallets just to make one table.
I didn’t quite know where to start to be honest, let alone where it would end up. But it turns out my vision was really easy to construct from the trusty old pallet.
DIY Pallet Coffee Table with Planter Boxes
You really don’t need a lot of tools for this project. If you’re using timber from a couple of different pallets, you’ll want a pry bar and hammer. You’ll need a hacksaw or skillsaw for cutting out the boxes and removing the pallet timber. A pencil and ruler always comes in handy. A hand sander, or belt sander, will save a lot of arm work. And you’ll need some screws and a drill. A staple gun is useful too.
A lot of people use a multi tool, and a reciprocating saw when working with pallets. So these might come in useful too (although I didn’t use either on this project).

Select a pallet
Selecting a good pallet to turn into a coffee table is the first step.
A little bit of intuition and creative thinking is required here. The pallet you select will really dictate how your coffee table will finally look. Almost every pallet is different in size, shape and quality. So you’ll need to be a little bit flexible with your final design idea.
I’d like to say just grab a selection of different pallets and then let them ‘talk’ to you. But lets not let this turn into ‘zen and the art of DIY pallet design’!
You probably will need a block pallet to recreate this design. Although you could easily use a stringer pallet, you’ll just need to reinforce around the planters with some scrap timber blocks.
Of all the pallets I had on hand, only 1 or 2 were really right for a table. So hopefully you can source your pallet from a large selection too.
The one I finally landed on was slightly shorter in width, so a more rectangular shape than the others, which I thought was more like a coffee table shape. I also choose one with fewer, but wider timber slats. I liked the chunkiness of this one, but a pallet with thinner timber slats will also make a great looking coffee table. Also, the one I found already had mitred corners on it. I thought this was quite unique and more interesting than a square edge.
Prepping – Sterilise, fill and sand
Of course, a little bit of prep work is going to be required. But don’t worry if you’re not really into prep work. Remember, this pallet table design is all about the raw finish. We’re not going to try and strip the pallet back to it’s bare bones for a perfect finish.
But you’ll find the following steps will take your pallet from raw, and potentially dangerous, to raw and pretty awesome.
Sterilise
The first thing I did was sterilise the pallet.

The pallets we use are all non-toxic, and clean. So I wasn’t concerned about toxicity at all. But I did want to go through a ‘fumigation’ process. This was just in case there was any mould or fungus, or even wee critters that had decided to call my pallet home.
I used a mixture of 1 part chlorine bleach to 2 parts water. This is fairly caustic, so you should use gloves, glasses and a mask (definitely don’t do this inside the house!). Add the mixture to a small spray bottle. Then liberally douse your pallet with the bleach. You want to moisten the entire pallet, getting it wet without water pooling or running. You may need to spray lightly back and forth a few times to really get the bleach in there.
Once you’ve sprayed the entire pallet, front and back, inside and out, you need to let it dry. The best place for this is outside, against a wall, in direct sunlight. The sunlight will evaporate the water, leaving the bleach in the timber, and will also sterilise the timber with UV light.
Fill
No matter how good looking your pallet is to begin with, there’s going to be a number of holes that need filling. You’ll want a good quality, hard-drying, pre-mixed filler, to get a nice smooth finish.
I filled all the nail holes on the top and sides. I filled any dents and knocks in the timber. I also ‘rebuilt’ a few of the edges and corners with filler too. There were a couple of interesting knots in the timber that I deliberately didn’t fill, so that I’d end up with a good raw look.
I used a wide filling blade to do this, and really overfilled all the holes, and especially the dents. As I was using a power sander, it’s always better to way overfill the holes, than under fill them and have the filler collapse in while drying.
Sand
I definitely don’t recommend sanding a pallet by hand. This job is pretty important, and wouldn’t be fun by hand!

When sanding, make sure you sand off any rough edges that might give splinters. You’ll want to sand all the edges of every timber, as well as the ends. Just imagine one of your kids rubbing their hands along the table edge (which they will do!), and you’ll soon get an idea of which bits need sanding back.
Then sand off all the dry filler, and run your sander up and down the timber slats until you get a finish you’re happy with.
The idea here isn’t to strip the timber back to a perfectly smooth product. But rather you want a nice smooth finish, with nice rounded edges, and still with plenty of character in the timber.
Build the planter boxes
The planter boxes are really simple to create.
First, you need to work out where they’ll go. I can’t really give you exact measurements here, as your pallet will dictate the finish. If your pallet has an odd number of timber slats, then you’ll be removing the middle one. If it has an even number, you’ll need to remove the middle 2.
The reason I suggest using a block pallet, is that you can use the blocks to attach your planter box timber to. This makes the job super-simple.
Just remove the top timber slat(s), using a skill saw, or reciprocating saw, flush with the end and middle blocks. So you’ll be making 4 cuts in total, to create 2 planter boxes. Leave the parts of the timber slat attached to the blocks intact. This gives the cut-out effect of the planters.

To build the planters, I used timber salvaged from another pallet. The pallet timber was exactly the height of my pallet block. If you’re not so lucky, you’ll need to cut your timber to the height of your pallet blocks.
I cut the 2 short end planter box pieces slightly larger than the width between the 2 timber slats. I screwed these to the pallet blocks. Then I measured between the 2 short end pieces to get the measurement for the long ends of the planter box. I screwed the long ends to the short end pieces top and bottom. The bottom of the planter box is already there, as the bottom pallet timber is attached to the bottom of the pallet blocks.
Attach a base for magazines
Again, I kept this part of the project really simple. I just cut down a piece of MDF to fit inside the pallet, and screwed this to the bottom of my pallet. Another way to do this, would be to salvage some pallet timbers and attach these with screws to the bottom of your pallet table width-ways.

Prime, attach wheels and finisher planters
Now it’s time to get the paint brush out. Prime your pallet coffee table all over. I used Resene Quick Dry Primer so that I could sand it and top coat it the same day.
Once you’ve painted the primer on, you may want to use gap filler to fill some of the gaps in the table, and take this chance to fill any holes or dents that show up. This step just depends on how raw you mind the finished look being. Either way, make sure you sand down the primer coat by hand, so that the finish is very smooth.
At this point I also screwed on the castor wheels to the table.
Then I used a staple gun to staple thick, black plastic to the inside edges of the planter boxes. Take a bit of time with this step. You want to staple the plastic on all around the top edge, and a few on the bottom corners, so that it holds up to the stones and soil. This is the only thing keeping water off your carpet!

Paint the final coats
We’re almost there. Now you just need to give your pallet coffee table 3 good coats of a high-quality, high gloss, water-based enamel. Choose a colour that suits your home and style. Anything from white to black, and most shades in between will work. Just make sure to apply that third coat, as that’s where the real pop of colour, and depth of gloss will come from.
We wanted something super-bright to provide a real pop of colour in our lounge, where the walls are white on white. We also wanted something that would work with our navy blue benchseats.
We went with Resene Enamacryl in Wild Thing, and the result was even better than we expected.
You can paint on water-based enamels with a brush or roller (or even a speed-brush). Just try to paint out of direct sunlight (I did all my painting in the evenings when it was cooler), as the paint will go off quickly, and become too tacky. Try to apply a very even layer of paint on the top and ‘lay off’ your paint with nice long strokes the full length of each timber slat.
Water-based enamels are fairly forgiving, you can work them a little bit. But as soon as you feel the paint beginning to get tacky, lay off once more and leave it. Ideally you don’t want to sand in between coats at all if you can get away with it. But if you do have to sand it, just touch it in small circles with a very light sandpaper, as you’ll definitely see deep sanding marks in the final coat.
Add plants and decorative stones
The last step in this simple, but epic, project is to fill the planter boxes.
I filled my planters almost to the top with gravel. I used a 40mm gravel to fill them, with a 20mm finer gravel for the top layer. This gives your succulents, or cactus a nice bed to sit in, and good drainage too.

Once you’ve filled the planters with gravel, make a small hole in the middle of each and sit your plant in. Try and keep some of the soil around the roots of the plant, but you won’t need all of the soil that comes with it. Most succulents and cacti need very little soil to live in. All the really want is filtered sunlight, a little water every now and then, and a spray of fertiliser every couple of months or so.
We went with a Spiral Aloe for this project (we’ve always wanted one in the garden, but it’s a bit wet where we live and I think they’d just rot here). It ended up being the perfect choice as the yellow tips of the aloe work really well with the bright yellow table.
But you could use just about any succulent or cactus (or even air plant) you like. You could try a taller cactus for height, or even bulk plant tiny sprouting succulents.
The white stones work really well with the green planting in the middle. But again, this was just a personal choice. A white table with glossy black stones and black mondo grass, a brown table with schist chips and pink dwarf alpine daisies… you get the idea, anything goes here, if you like it, then it’s right!
For more awesome DIY ideas, check out our DIY and Outdoor section.