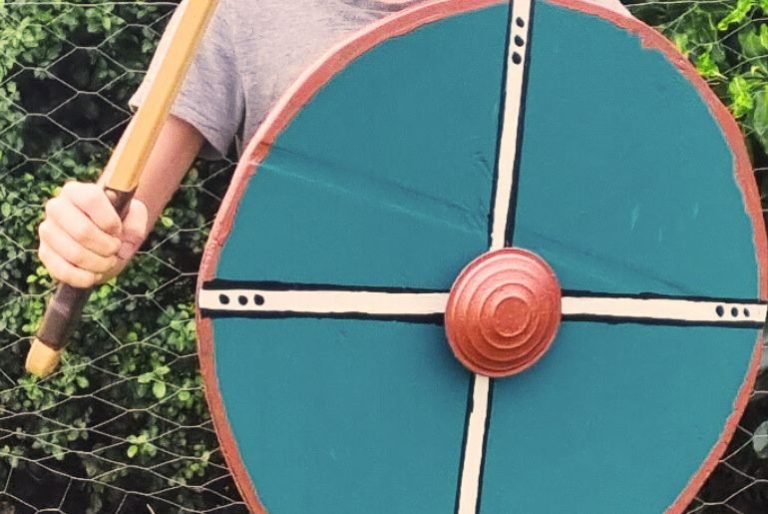
This isn’t the first time we’ve tackled a Viking-themed craft. Find out everything you need to know to make a Viking shield that looks and feels like the real deal.
This year we had a blast taking the kids to the very cool Medieval Market. There were knights and fair maidens, and real weapon battles, and we all tried out some archery. Our son was totally into a handmade wooden viking axe that he wanted to buy.
And we thought that was quite cool, as we’d just finished watching the new season of Vikings Valhalla! Both sides of our family have Norwegian ancestors, and our son even has a Nordic name, so we’re into anything Viking at the moment.
Of course as soon as we got home, our son started saying he needed a shield to go along with his new axe. We have actually done a similar DIY project before. Those Viking shields actually turned out pretty cool, but they were intended to be used as blackboards, more than a toy, and sure enough they ended up in the playroom as chalkboards.
So this time around, we wanted to make something that looked and felt a little more authentic, to match the wooden axe he loves so much.
Previously we researched Viking clan insignia, and this time we wanted to create something with a similar aesthetic to the shields below:

We used 12mm plywood again, which is really easy to cut shapes out of using a jigsaw. And we made the shield a little larger at around 450mm in diameter, which is a good size and weight shield for our 7 year old.
We also made sure we used metal this time for the central dome, or what’s called the ‘shield boss’, which really sets it off. You can basically use anything that’s small, round, and metallic and just glue, or glue and screw, it to the shield. We repurposed the end of an old broken watering can, which worked out well.
Another difference was the handle we added, or what’s known as the ‘enarmes’ or sometimes ‘braces’. Previously we screwed strips of leather from an old belt onto the back, and this worked well, but also rubbed a bit and got a bit uncomfortable after a time. This time round we repurposed a U bracket for wall storage. It sits across the arm and allows for a good grip. Another option could be a wooden u-shaped door handle.
It does go to show it pays to use your imagination when doing a little DIY, as you never know what might work.
Probably the main difference this time around, is that we choose to paint the Viking shield, so we had a chance to create a great-looking Viking clan design.
DIY Viking Shield Craft
You will need
12mm untreated plywood (1200mm x 600mm sheets are ideal for transporting in a car)
Round flat metallic object for the centre dome
U bracket (or old leather belt or timber handle)
Pencil and string
F2 contact adhesive (or similar high strength all-purpose glue)
Jigsaw
Battery drill and small screws
Electric sander (or multi-tool with a sanding bit)
Resene testpots (White, Metallic Copper, Nero), 500ml SpaceCote Low Sheen (in Yowza)
Safety gear, glasses, ear protectors, etc
What to do
1. First, draw a circle shape onto the plywood. You can either trace around a large round object, like a bucket, or use the pencil and string. Tie the string around the base of the pencil and measure out around 225mm of string. Hold, or pin, the string where the centre of the shield will be and pull the pencil out tight. Keeping the string taut, begin drawing a circle, you should end up exactly where you started with a circle around 450mm (or twice the length of the string).
2. Using the jigsaw cut the circle shape out of the plywood. Use the electric sander to sand the edge nice and smooth, and remove any possible splinters.
3. At this point you want to attach the dome, or boss, and handle, or enarmes. Glue and screw the handle to the back using small screws that won’t go right through the plywood. Find the centre of the shield and glue on, or glue and screw.
4. Choose your favourite Viking insignia and freehand draw this on the front with the pencil. Our son really wanted a cross design. So we used a spacer to draw on parallel lines to create 4 quarters.
5. We used a nice forest green colour, Resene Yowza, for the quarter sections. We painted white lines between each quarter, and then outlined these with Resene Nero. We then used Resene Metallic Copper to paint the dome a nice metallic colour. And we outlined the whole shield in Metallic Copper to finish it off.
If you’re looking for a simple way to craft a matching Viking axe, using the same plywood as the shield, then check out our previous version of this craft Viking Shield and Axe.
This has been a great project to do with my son. It gave us a real opportunity to bond over power tools. And the result is a DIY toy that he’s really proud of, and commands pride of place in his bedroom!
And for hundreds more art and craft ideas, check out our School age: Arts and crafts section.


