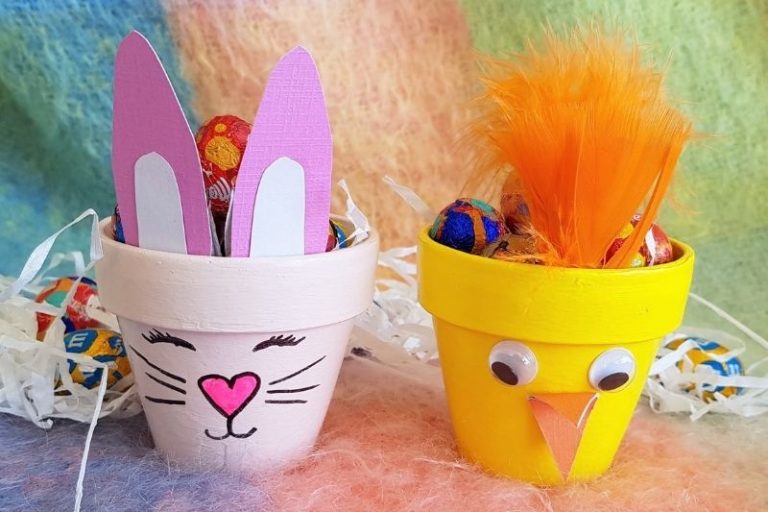
Easter is just around the corner so I’m making these cute little Easter bunny and Easter chick terracotta pots for our Easter Hunt this year.
I have chosen to make these a surprise at the end of the hunt, but kids of all ages will enjoy making these just for fun, or for school gifts. You can use any size pot you like for this activity, but I chose one of the smaller ones. If you’re working with young children you might like to get a medium-small terracotta pot, as they’re a bit easier for little fingers.
Easter Bunny and Chick Terracotta Pots
You will need
2 Terracotta pots
Resene test pots in Half Turbo and Blanched Pink
Resene quick dry primer (optional)
A black permanent marker
Paint brush
Pink paint pen or pink permanent marker
2 googly eyes
1 Pink pompom
Orange and pink card
Scissors
Glue (I used Elmars clear glue but any PVA or even a hot glue gun will work for this)
What to do
1. If you are using a primer then paint that on first. You don’t have to use a primer but it helps make the colours brighter, especially the yellow (Half Turbo). I just used one coat.
2. Once the primer is dry, paint each pot with two coats of Half Turbo and Blanched Pink and set aside to dry.
3. When the paint is touch dry use your pink pen to draw a heart for the nose of the bunny.
4. Now use the black marker to outline the nose, draw in the mouth and draw on the eyes.
5. To make the bunny ears fold a piece of pink card in half and draw on an ear shape.
6. Cut around the ear shape, and because you folded it you will now have two ears.
7. For the inside of the ear I just turned over my pink card (as it was white on the other side) and repeated step 5 and 6 only making the ear shape slightly smaller.
8. Glue the white to the inside of the pink ears.
9. Now glue the ears to the inside front of your terracotta pot.
10. Finally for your bunny glue on a pompom tail at the bottom on the back.
11. To make the face of the Chicken use the orange card and cut out the shape of a diamond. Fold this in half and glue the fold right in the middle of your pot.
12. Glue on the eyes and two orange feathers on the inside front. Like in the below.
13. Finally, let all the glue dry completely and fill your pots with mini Easter eggs.
If you like this post check some of our other easter crafts. And, for hundreds more craft ideas, check out some of our other creative arts and crafts ideas.


