Having kids create their own gift bags is a really cool way to add a special touch to any gift. It also helps save a lot of wasted money for friend’s birthdays with gift bags that end up literally thrown in the bin at the end of the party!
With the come back of paper bags in supermarkets and grocery stores, there are no shortage of cheap, and biodegradable, bags on hand.
Today I’m going to show you a cute little design that can be used for a number of different occasions. These giftbags will work for special days such as Mothers Day or as Easter bags, and equally as giftbags for children’s parties, or even to wrap Christmas presents in!
I’m using acrylic paint today but I’m going to use it like water colour paints. Befor you start make sure you have some newspaper down and a jar of clean water close by. I also like to have some paper towels on hand to wipe the brushes on.
How to Make a Beautiful Gift Bag from Free Shopping Bags
You will need
Brown paper bag
Resene test pots in an assortment of bright poppy colours
A black marker
A stick to drizzle paint with
A paint brush
A jar of water
A paper towel
Thick A4 paper
What to do
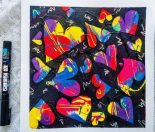
1. On a piece of A4 paper use a clean paint brush to paint plain water onto your page.

2. While the paper is still wet, add your paint colours to it randomly.

3. Once your have your colours randomly painted on, lay a paper towel over the top to soak up the excess water. Then slowly pull it off to reveal the underneath (kids LOVE this part) and set your paper aside to dry.

4.While the paper is drying,use your black marker to add a boarder around the outside of your bag. I just did simple arches here, organic swirls or cultural designs would work well, and even geometric shapes.

5. If your painted page is dry use your black marker to draw a tulip flower design. To draw a tulip, simply draw a large ‘U’ shape, and then draw a zig zag along the top. You don’t have to choose tulips either, be inventive and draw any flower head you like. Draw them in a couple of different sizes for interest value.

6. Cut out the flower heads.

7. Glue them onto your paperbag in a random assortment, as if they were popping out of a flower garden. Now with the black marker add a simple, straight stalk from the flower head to the bottom of the border.

8. Finally, add some leaves to the stems, and add some detailing to your boarder if you haven’t done so already. Also if you like repeat steps 1 – 8 for the other side of the bag.

If you enjoyed making this craft idea, be sure to check out some of our hundreds of other crafting ideas.