It is pouring with rain today as I sit in my studio and ponder what arts and crafts I can make with the kids. I’m looking around at all my random art supplies and spot paper coffee cups and discarded plastic plant pot holders.
This reminded me of toy we made at Brownies when I was a kid. It was a really simple idea where you tied a ping pong pall with ribbon and attached this to a paper cup. It was a homemade cup and ball game. So I thought, I wonder if I can recreate this idea, and craft it up a bit!
The Cup and Ball game originated in France as early as the 16th century. It was called bilboquet, and it became a worldwide toy sensation! Just look the modern day hula hoop, or roller skate crazes! It’s actually a great game to help build your children’s hand and eye coordination.

Originally the game was made out of wood, had a long handle to hold, and a wooden ball tied to the handle with string. The top had a small cup carved into it, and the bottom had a carved peg you could store the ball on when not using. The goal of the toy was to try and land the ball on the cup. By the looks of things it must’ve been very frustrating to play!
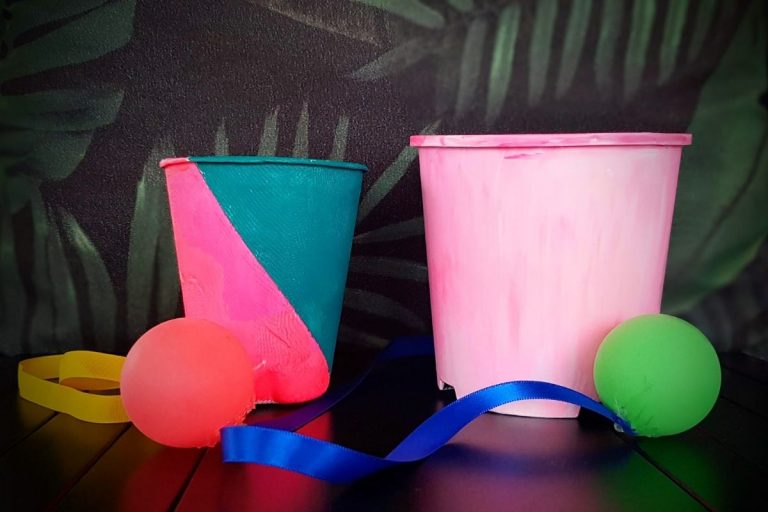
This recreated version using recycled coffee cups and plastic plant pots is a little easier than the French version, but still lots of fun for kids to play with.
So we’re going to make two Cup and Ball games. One is made from an old, cleaned coffee cup and one from a recycled plastic plant pot. Just like the ones you get your herbs in from the supermarket.
The plastic plant pot one is great for younger kids to play with because the opening is larger, so it’s a little easier to get the ball into.
Recycled Cup and Ball Game
What you need
A clean paper coffee cup
A plastic plant pot
Ping pong balls
Resene Quick Dry Primer
Resene test pot in Yowza
Resene FX Fluoro Pink
Hot glue gun and glue
Ribbon
Paint Brush
Masking tape
What to do
1. Paint your plastic pot with the quick dry primer. You may not need to use primer on the coffee cup, but it does make an easier surface for children to paint onto. You might need 2 coats on the plastic pot.
2. When the primer is dry tape off a diagonal line that goes around the cup and paint one side with Fluoro Pink. Give it two coats.
3.Once the pink is completely dry peel the tape off and re-tape the pink edge. Then paint the other side with Yowza.
4. For the plastic plant pot I don’t recommend using tape on it as it may peel the primer off. Instead, using the Fluoro Pink paint the top half of the pot. Now while the paint is still wet, mix some white, and starting from the bottom brush up into the pink, swiping up into it. This will give it a really interesting ‘dragging‘ effect . Of course, you could just paint the whole thing with the Fluoro Pink!
4. Once all the paint is dry, grab a piece of ribbon about as long as your arm and tie it into the holes at the bottom of your plant pot.
5. For the paper cup you’ll need to put two little holes into the base of the cup. I used a nail to pierce a hole and a pair of scissors to make the hole slightly bigger. Now you can pass the ribbon through the holes and tie it on. This part is a bit fiddly for little ones, but older kids can give it go.
6. Finally, hot glue the ribbon to the pingpong ball.
Now all that’s left to do is have fun playing with them. We had lots of fun setting challenges, like who can get the ball in the cup the most times in a minute, or who can get the ball in the most times in a row.
If you love arting and crafting be sure to check out hundreds more craft ideas here School age: Creative arts and crafts.


