I am loving playing with stencils at the moment. They are pretty easy to use and you normally end up with a fairly good result. I found a bunch of wooden photo frames lying around the house which I’m pretty sure I got from an emporium shop, but I have also seen them at places like spotlight and some education stores.
When it comes to stencilling, a couple of good tips is to use a foam dabber. Make sure it’s dry when you dab the paint on. This will minimise paint leaking under the stencil.
If your brush is wet it will cause the paint to become runny and leak under your stencil design. And remember to only dab a small amount of paint onto your foam dabber.
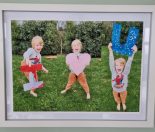
Stencil Photo Frame

You will need:
Wooden photo frame (here is a link to some I found online)
Stencil (Mine is from spotlight but you can find them where most crafts supplies are sold)
Resene test pots (Go Go Go and Quarter Silver Chalice)
Foam dabbers (mine were from warehouse stationary)
Ombre mini pom pom trim (I found mine at spotlight)
Hot glue gun and glue sticks
What to do:
1. Take the middle out of the frame

2. Paint the whole outer of the frame with Quarter Silver Chalice (this is an off white colour).
3. Once your base colour is dry place your stencil onto your frame. You will need to hold the stencil firm and quite still. This is a good time to call on one of the kids to help, or if the kids are making it, it’s a great time for the parent or caregiver to lend a hand.
4. Using your foam dabber dab just the end into Resene Go Go Go. I like to do my first dab onto a spare piece of paper, this will take of any excess paint.

5. Lightly dab the paint onto your stencil. Making sure to hold your stencil firmly in place.

6. Once it is dry which won’t take too long hot glue your pom pom trim around the outside. I recommend starting at the very top where the hood is attached. This will give you a tidy finish.

7. Lastly add in your own special photo.
I hope you have enjoyed making a stencilled photo frame as much as I did. If so make sure to check out some of our other craft ideas.