

We love getting creative in our family and I believe it is extremely important for children to be able to use their minds and imagination to explore different ideas. With Christmas coming up, I decided to inter-loop being creative and Christmas gift making together to make affordable yet fun Christmas ideas that would be perfect for grandparents, family friends, teachers etc.
This idea is very easy, cheap and messy!
Paper Mache Bowls
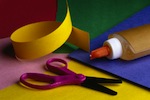
What you need:
– 1 good size bowl from your kitchen for each paper mache bowl you want to make
– Glad wrap
– Lots of newspaper
– Plain white paper (printer paper works well)
– Glue (or homemade glue – recipe below)
– Lots a clear space , preferably outside and you could have a bowl of water and towel handy for when you are finished.
Instructions:
 1. Wrap each bowl in glad wrap, making sure you go over the rim of the bowl enough (but you don’t need to cover inside the bowls).

2. Rip up heaps of newspaper in a seperate bowl, which your kids will love to help with. Don’t make the pieces too small or too big though. (Tip: if you are working outside put something like a rock on top of the ripped paper so it won’t blow away if there is a gust of wind and you can grab it with your gluey hands!)
3. Prepare the glue, or make homemade glue:
You’ll need warm water and some flour. Simply put about 1-2 cups of flour in a separate bowl and slowly add warm water while mixing. It is up to you to choose the consistency of glue you want. I started with a thick one like a paste, but discovered it cracked slightly so went a lot runnier next time).
4. Make some clear space for all your bowls, paper, glue etc. (Because my children are so little I chose to do the paper mache mainly by myself however the eldest, 2 years old, did help at one stage but soon got bored).
 5. Now all you need to do it smother your glue covering small areas of the glad wrap at a time then directly placing
  one piece of newspaper on top, then more glue to hold it in place. Do this over the entire surface of each glad wrapped bowl until all the glad wrap is covered, also go over the rim with the newspaper. You will need 3-4 layers depending on your glue, etc. – but you MUST make sure you dry each layer completely in between. Unfortunately this is where it can take some time, I left each layer to dry over night. If you don’t then it will mould and crack.
6. Once you have done all 3-4 layers, your last layer will be with the plain white or coloured paper. Let that dry over night.
 7. This part was slightly tricky but we got there in the end with the help of my partner. Using a craft knife or simliar you will need to cut around the rim of each bowl to free up the paper mache. You may need to wriggle the knife down the sides slightly also too. Then slide off the paper mache and peel off the glad wrap.

 8. This is the fun part where your kids can get involved. Go wild with painting! You can also try using sponges, leaves, brushes, hand prints, and so much more. Get creative! You could also cover them in pretty paper or collage images onto the bowl. You may also like to varnish or seal the bowls.
You could ei ther give them as a gift as is – or put some chocolate/goodies inside and wrap with tissue paper.
These bowls are a great present for family of friends and are a lovely way to get your children involved in gift making. I’d love to hear about your Christmas gift ideas as well… what do you make with your kids??

[…] Paper Mache Bowls – Kiwi Families […]