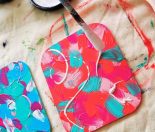
I used my favourite ‘messy’ art technique making custom/upcycled coasters earlier in the year. I recently discovered blank baubles at Kmart and thought I could recreate it on these too. You’ll love these easy custom Christmas baubles.
The baubles that I discovered were made of ceramic, and very cheap. And this was a great surface to paint on. I think there are also a type of papier-mâché blank bauble, that would work well too, you can source from craft stores.
If you can only source the blank, plastic type baubles, these should work well too, but you’ll need to paint one coat of Resene Smooth Surface primer on first.
I’ve been playing with this ‘messy’ technique for a while now, and I love it. It allows you to choose a colour palette you love. But you’re not restricted by a design, or a geometric shape, in any way. In fact, the more layers you apply, and artistic flicks and blobs you add the better the result!
I’ve included the colours and technique here that I used. You can follow along to create similar baubles. But I encourage you and your kids to really explore and have fun.
Younger children will create a ‘messier’ design. But that’s all part of the fun. Just allow the baubles to dry and have them paint a few more layers in similar colour tones to really build up a base. Once they’ve achieved a good coverage, with interesting swirls and splodges. Finish with the flicks and dabs of contrasting colours on top.
Older kids may want to ‘refine’ their messy design on a piece of card first, before applying to the baubles.
Christmas DIY painted Baubles
You will need
Ceramic blank baubles from Kmart or your favourite craft store
Resene test pot paints in Niagara (jeepers Creepers), Deep Sea, Picton Blue, Scotti Silver, Can Can and Colour Me Pink
Resene Clear Art Glaze
What to do
- Paint your whole bauble in Niagara and let it dry. Add a second coat and paint all over again, but being a little messy this time, leave some deep brush strokes for texture.
- For an even more interesting colour, add a little white paint to the Niagara and paint a third coat, keep it a little messy, with brush strokes showing. This creates a little colour contrast as well as texture.
- Add flicks of Deep Sea and Picton Blue. When this is dry, come back in with a few flicks of Niagara. You can change your brush size for each colour.
- Once that is dry add in some flicks of Colour Me Pink and let this dry to speed up the drying process with a hairdryer.
- With the lightest colour Can Can drizzle this over your decoration.
- When it’s dry, paint the top with Scotty Silver.
- Once your baubles are dry seal them with Resene artists art glaze.


Now all that’s left to do is dress your Christmas tree with your favourite lights and tinsel, then finish it off with your children’s custom-made baubles. Or you could create a Christmas table dressing, with a smaller LED Christmas tree, and your custom baubles spread around.