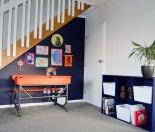
This has to be one of our most successful DIY projects we’ve made for our little one. We made this kid’s play kitchen using an old bedside table drawer and gave it to her as a present. She just loves playing with her pretend kitchen, and now her little brother does too!
This project was super fun and fairly easy to make with the right tools.
We decided to make our daughter a DIY play kitchen when I found a redundant set of drawers in Mum’s garage. They were a bit old, and covered in dust, but they just had ‘upcycle me’ written all over them!
This led to a fair few nights searching on Pinterest and other DIY websites, looking for different kitchen ideas made from drawers. There are some seriously amazing ones out there.
Once we decided on a fairly basic design for the DIY play kitchen, it was off to the op-shops and our local landfill, to find old tap fittings, knobs, door handles and all sorts of kitchen utensils and odds and sods.
It was so much fun finding fixtures and miniature objects that could be used with the kitchen!
Really, we found all sorts of unusual things that were just perfect. An retro wooden salt and pepper shaker, a miniature pink pig whisk, tiny spatulas. Yea, we spent waaay too much time down at the Salvation Army op-shop. But it was great fun, and in all in the pursuit of making the make-believe come to life!
You just have to let your imagination run wild, and you can easily find a treasure trove of trinkets for your child’s play kitchen.
What we like most about this project is that we’ve created a wooden play kitchen that’s every bit as awesome as the shop bought kitset ones. And it cost a faction of the price. And we recycled and upcycled a bunch of items that were destined for the landfill.
Many of the measurements and steps given below will depend on the shape and size of your drawers. And the fittings, bowls, and accessories will also determine where things will get placed. This is part of the fun though, you’ll need to let your drawers ‘speak to you’ as it were!
If you want to give this project a go at your place, here’s how we went about it.
Kid’s Play Kitchen Using Upcycled Bedside Table
You will need
An old bedside drawer
Resene Waterborn Smooth Surface Sealer and Resene Test Pots (we used Pink Terrace, Vanilla Ice, Pale Rose, Solid Gold, Black and Roadster)
Small bowl (for the sink)
Small silver drawer handles (2 round ones for the cooking knobs, and 2 rectangle ones for the oven handles)
Painters tape
Small sheet of plywood, or MDF (for the splashback and shelf)
4 hinges
2 Drawer magnets
Tap fittings
Pencil
2 large brackets (we found some faux ornate cast iron ones)
Screws
Timber glue
Hooks
Nails
Tools needed
Jig Saw
Battery drill/screwdriver
Skill saw, or handsaw
What to do
1. Start by creating the oven doors. Pull the drawers out, and use the skill saw or handsaw to cut away the front face from the drawers (if the base of the drawer is made from sturdy timber, you can carry on and cut the sides and end away from the base, and use this in place of the plywood for the splashback and shelf).
2. Now that you’ve removed the top drawer, you can cut out your sink. Place the small bowl upside-down as close as you can to one edge (look from underneath to make sure you won’t hit the edge). Draw lightly around the bowl onto the drawer to create a template. Drill a pilot hole using the battery drill about 5mm in from your template edge. Now use the jigsaw to cut out the sink template, staying about 5mm in from the edge all the way round. Your sink bowl should now sit snuggly in the hole.
3. Next, drill 3 large holes into the top, about 30-50mm from the edge of the sink, for the tap fittings. These might fit very snuggly, or you may have to glue them in the holes, depending on what fittings you can source.
4. Now drill 2 small screw holes for your knobs. Position these about 50-100mm from the edge of your sink. Again, the measurements will depend on your bowl size.
5. Using the plywood, MDF, or drawer bases, cut out a splashback the same length as the drawers and about 3/4 the height. Also cut out a square side shelf at the same time, the same width as the drawers. Fix the splashback to the back of the drawers using 4 screws, and timber glue. And fix the side shelf to the drawers using the 2 large brackets

6. Paint the whole thing, including the shelf, splashback and oven doors with Resene Smooth Surface Sealer. Then paint the oven, splashback and oven doors with 2 coats of Resene Pale Rose, and the side shelf with 2 coats of Resene Vanilla Ice.
7. Once the splashback is dry use the tape to mask off a set of geometric triangular shapes and paint them randomly using Resene Solid Gold, Vanilla Ice and Pink Terrace. Once dry, remove the masking tape.
8. On the top of the drawer mask off a rectangle ‘hob’. And mask off a rectangle ‘window’ on the oven doors with rounded corners. Then paint 2 coats of Resene Black in high gloss. Once the black paint is dry use Resene Roadster to paint red ‘elements’ onto the stove top. If you want this to be hard-wearing for the long term, you could paint over with a coat of high gloss clear. Once dry, remove the masking tape
9. Screw one side of the hinges to the bottom of where the drawers used to sit. And screw the other side to the back of the oven doors. Screw the magnets to the top of where the drawers used to sit, and line up the magnet striker plates, and screw those to the back of the oven doors. Then screw on the small rectangle drawer handles above the painted window. You can now fix your tap fittings, and lightly screw on the 2 round drawer handles as knobs, so that they freely spin.
10. Finally screw 6 small screw hooks underneath the side shelf to hang pots, pans and utensils from. And if you’re lucky enough to find a small spice rack like we did, you can paint this, fix it to the other side of the oven, and add more hooks to hang accessories from.
Now just kick back, put in your order for some wonderful pretend food, and watch your little one’s imagination come alive, as they serve up delicious meals from their new play kitchen.


Now that you know how to make a kid’s play kitchen using an old bedside table, you should definitely check out more great ideas in our DIY and Outdoor section.