

Shaving cream is my new, favourite art material, to use with my little ones. It can be used for a number of different sensory and craft activities. Today we created this marvellous marbling effect with shaving cream.
This is such an easy process and not too expensive. We just used a home brand shaving cream so it only cost a few dollars. And you hardly use up any paint at all.
And because I discovered we’d used all our food colouring up during our pretend potion making sessions I had to improvise. So we mixed up a small amount of acrylic paint with water in ice trays and the colours came out really great.
This was our first time using the shaving foam for marbling, and it was a blast. Little miss 3 loves all the different stages that happen when making our marbled pictures. But her favourite part is swirling all the colours together and seeing all the different patterns she could make.
The final effect you get is just beautiful. Once you’ve made a few prints you can use the final artwork to make birthday cards, Mother’s and Father’s Day gifts, etc. Just fold the thick paper in half to create a card. You might like to embellish by using a little glitter, and perhaps creating a border around the edge with material. You’re only limited by your imagination here really.
You could also simply place them together as a collection in white frames and hang them on your child’s wall. Kids love having their own art displayed! You can source really cheap white frames from homestores now. Otherwise try scavenging fancy frames from garage sales, etc. and then using spray paint to paint all the frames the same colour.
Marvellous marbling effect with shaving cream
You will need
Shaving cream (the white foaming type not the gel type)
A shallow container to play with the shaving cream in
Food colouring, liquid water colour paints, or mix a small amount of water with any acrylic paints.
A stick or chopstick for mixing
Droppers
Thick card for scraping the foam off your paper
Water colour paper or thick paper
What to do
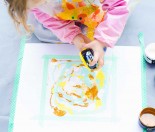
1. Spray the shaving cream into your dish. We used a tray under our dish to make clean up easier. Then, if you like, you can smooth out the shaving cream using the back of a spoon or a spatular. Kids love to do this part themselves.

2. Use the dropper to place the food colouring, or watered down paint onto the shaving cream.

3. Using your stick or chopstick swirl the food colouring around to make a marbled effect (don’t over mix it or it will go muddy).

4. Once the colours are nicely swirled together, lay your paper down on the shaving cream, and press lightly.
5. Remove the paper and scrap it with a thick piece of card to remove the excess shaving cream.

6. Leave the artwork to dry in a warm spot. Now you can frame it, or turn it into a gift card.

For heaps more creative ideas, check out our Arts and crafts section.
really love the effect of this!