Paper Mãché Volcanoes are such a fun activity for children of all ages to make. But they’re especially fun for young kids, who’ll love playing with the goop once the volcano has ‘exploded’.
We found this was a great way to use up some old paper too. We tore up strips of old present wrapping paper, and it was perfect to use as paper mache.
Small children can struggle a little using newspaper or tissue paper for paper mache, as it can get a little fiddly. But the slightly thicker paper is a breeze to pull through the glue and create your mountains.
We used bowls to create our mountains. One was a great mountain shape, the other was a little rectangle looking, not that the kids minded one little bit! We also found wrapping the bowl with baking paper made the paper mache really easy to slip off once it was dry.
To create the ‘cone’ in the top we just didn’t put any paper mache there. And the baking paper slumped down a little. This gave us a good amount of space for the baking soda and vinegar.
Paper Mãché Volcanoes really are a cool craft project. Just make sure you have a few days to make them, as you need to wait for the paper mãché to dry, usually overnight, and then you need to wait again for the paint to dry. But it’s a great activity to do over the school holidays, or a long weekend.
Here’s our kids’ versions. We’d love to see yours. Get in touch on Instagram #kiwifamilies, or email us in a pic and we’ll post it to one of our social channels.
How to make a Paper Mãché Volcano
What you need
White glue
Water
Scrap paper
A medium bowl
Baking paper or plastic wrap
Baking soda
Vinegar
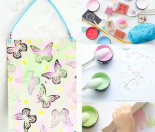
Acrylic paint (We used Resene test pots in Japanese Laurel and Kaitoke Green)
What to do
1. Mix up 1:1 white glue with water in a bowl.
2. Turn a glass bowl upside down and cover it with baking paper or plastic wrap. We used baking paper because we don’t use plastic wrap anymore. You will need to tape the baking paper around the bowl.
3. Rip the paper into long, thin strips.
4. Run the paper through your glue mixture and start wrapping it around the bowl.
5. You just need to give this around 3-4 layers of paper.
6. Let your Paper Mãché dry overnight in a warm place.
7. Once it is dry it’s time to paint it. I poured the two types of green paint into seperate containers and then just let the kids paint it on how they wish. They mixed both the colours together. And it ended up giving a great green forest look to the mountains.
8. Let the paint dry. You can speed this step up by using a hair drier.
9. Once it’s dry you can make the volcano explode! Take the bowl out from underneath the volcano. And place the volcano into a wide dish.
10. Fill the top of the volcano with baking soda.
11. Put around a quarter a cup of vinegar into a cup and add a few drops of red food colouring to it.
12. Lastly add the vinegar to the baking soda and watch your volcano explode!
For hundreds more art ideas, check out our Creative arts and crafts section.