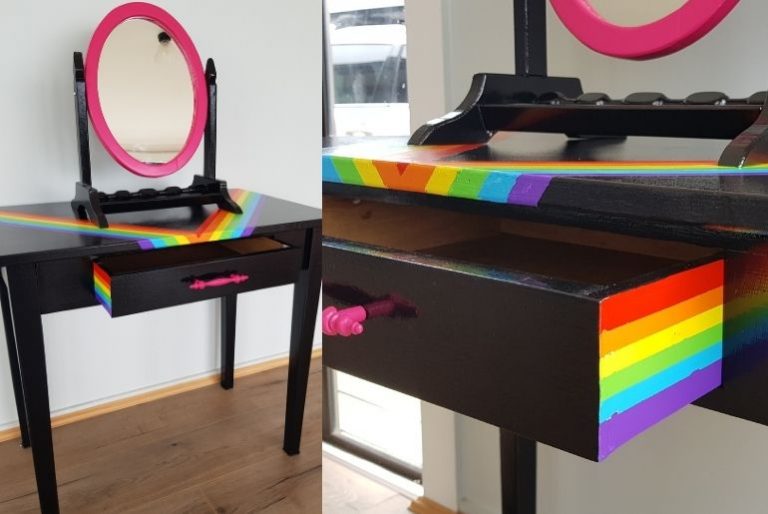
We recently bought a new home, which is all very exciting, and we’re now turning our minds to getting all the rooms ready before we move in.
Call it serendipity if you will, but we randomly decided to drive past our old house a few weeks back, and I saw a cute dressing table on the side of the road for sale! It was perfect for my daughter’s room, and only $20, so we jumped out and grabbed it!
My daughter Saige loves it, and we decided to let her choose how to design it. Saige requested a rainbow dressing table (should have seen that one coming!), so her rainbow dresser was born.
Doing an upcycle project can seem like a daunting task at the beginning, but really it really does just take a little paint and perseverance to bring something back to life. And trust me, it’s super-rewarding creating your own unique piece of furniture for your home.
Taping up tip: In the images you will notice I used standard masking tape. I highly advise against this! Buy the proper delicate surface painters tape, or even just use up some old Washi tape. The standard masking tape has too much adhesive, and will pull your paint off. This lead to me having to do a few touch ups before swapping to a better tape.
How to Make an Upcycled Rainbow Dressing Table
You will need:
A dressing table to upcycle
A small roller and tray
A medium and small paint brush
Testpots of Resene lustacryl semigloss waterborne enamel in Chaos, Half Turbo, Chilean Fire, Wham, Snap, Kingfisher and Irresistible
1 litre of Resene enamacryl gloss waterborne enamel in Black
Painters delicate masking tape
Large ruler
Craft knife
Thick and thin Washi tape (optional)
What to do
1. Go second hand shopping and chose a funky dresser! You could try TradeMe/eBay, or your local Sallies/op-shop, local garage sales or your local refuse centre if they have a recycle shop. Or, you might be lucky enough to find something on the side of the road…
2. If your dresser is painted, but in good condition, it may just need a light sand all over. If it’s a bit rougher, like mine was, then get an electric sander and sand your piece right back, and touch up any bare spots with a quick-dry primer. If your dresser is unpainted, or has been stained, you’ll need to apply Resene smooth surface sealer as the first coat of paint. If you’re making this for a kid’s room, this is a great time to let them help. Teaching your kids how to use power tools safely, popping on earmuffs, using the right technique, is really empowering for them.
3. Make sure you unscrew any handles. This is also something kids can have a go at, and is great for fine motor skills.
4. Next you will need to tape off the Rainbow V shape. I did this by creating a guide line using a level ruler. First I found the centre point of the dresser. Then I drew a V with a pencil, starting at that centre point all the way to the outer edges of the dressing table. For ease I drew my outer V to match the width of the level ruler.
5. In order for each rainbow colour stripe to be the same, I made this easy on myself too, and made the stripes the same size as the width of my masking tape. This meant I could just butt up 6 pieces of tape together starting from my bottom guide line. But you could create different sized stripes too.
6. To tape the V, begin by lining up your first piece of tape with the outside of your bottom drawn line. Then continue adding your pieces of tape next to each other. I ended up with 6 stripes on each side of my V.
7.Once all your V shape is taped out, it’s time to paint the dresser with Resene enamacryl gloss black. Pour a little into your roller tray. Paint in the edges of the table, and the outside edges of the tape, with a paintbrush first, then roll the rest on. For the best results you will need 3 coats. Allow each coat to dry completely for at least 3 hours. But refer to the back of your tins for the drying times. This is also a great time to get young kids involved as they love using rollers!
8. While you are waiting for the paint to dry put your first coat of black onto the front of the drawer. This will also need 3 coats.
9. For the mirror I unscrewed it from the stand and then cut out a piece of paper the same size as the inner mirror. Then I just pushed it into the gap where the mirror and wooden frame meets. Much easier than taping it up!
10. Paint the the stand of the mirror with the Resene Black and the Mirror rim with Resene Irresistible. Once again these will need 3 coats of paint each.
11. While the mirror colour of Irresistible was out I also used it to paint the drawer handle. This needs 3 coats, maybe more, depending on what the handle is made from.
12. Once the drawer is dry I created a rainbow stripe along the side of the drawer too. To do this I used two different sizes of Washi tape. I did this so I could fit all 6 colours on the drawer, as it wasn’t very wide. I like the effect though, and you could do something similar on the table top too.
13. Now, here’s the tricky part. First pull the first, third and fifth piece of tape off the drawer. Paint the first stripe with Resene Chaos, the third with Half Turbo and the fifth stripe with Snap. These will need 3 coats. I did 4 because I really wanted the colours to pop. Then, once the first colours are totally dry, tape back over them. Then pull the last three stripes off, and paint those in Resene Chilean Fire, Wham and Kingfisher. Repeat the same process on the other side of the drawer.
14. If your dresser is completely dry it’s time to peel off some of the tape. Just make sure you take your time for the best results. The way I do this is to grab a craft knife and a ruler. For each piece of tape you are going to pull off you need to lightly score the edges of your tape then pull it off nice and slowly, watching for any bits of tape that might pull the black paint away. We’re going to follow the same process as the drawer edge. First, peel off every second stripe.
15. Using Resene Chaos, Half Turbo and Snap paint in each stripe of the rainbow. I put 4 coats on for extra pop, but you will need at least 3 of each colour.
16. Once your first 3 colours are completely dry, lightly score the tape edge with a craft knife. Then tape back over the 3 colours you just painted. Make sure they are completely dry too, I would advise to leave it overnight before taping the colours off.
17. Now paint in Resene Chilean Fire, Wham and Kingfisher the last 3 stripes. These will also need 3 or 4 coats.
18. Make sure you score the tape lightly with a craft knife before pulling the tape away. If you notice a small pull in the any of the paint colours, as I did, don’t freak out. Just use your craft knife to stop it from pulling further. Then you can just do a small touch up with a tiny brush. And from a few feet away, you can’t see these little blemishes.
19. Once your handle, drawer, and mirror is completely dry screw everything back together.
20. Now all that’s left is for you, oh I mean your kids, to enjoy the finished results!
If you liked making this upcycled rainbow dresser, then check out some of our other DIY articles.


