It’s almost Easter and the smell of chocolate is in the air! I thought it would be good to have some Easter crafts for kids that you can easily do at home.
1) Coloured Easter Eggs
This is a great activity for your kids to get involved in for Easter, heaps of options and most the materials will already be in your kitchen cupboards. For some parts an extra set of hands may be helpful but not essential. Word of advice though: have all your necessary materials within reach and have a workspace with some newspaper or old towels around so any stray food colouring doesn’t stain important items. You may also like to cover up your kids for the same reason!!
Materials:
Eggs
Different Food colouring dyes of your choice (or what you already have)
Plastic containers or cups (one for each colour)
Paper towels
Rubber gloves (optional – if you don’t want stained fingers for days afterwards like I did :))
Different ways to colour your eggs:
(Best option is to hard boil your eggs first- then they are easier to work with especially for children)
1. Crayon effect – Use different coloured crayons to draw on your egg once it comes out of the pot and while still hot so the crayon melts on slightly. Allow the egg to cool and dip it in dye making sure the whole surface is covered. Then rest the egg on a paper towel to dry.
2. Splatter effect – Once egg has cooled after boiling, take outside. Dip an old toothbrush in food colouring and simply flick the toothbrush towards the egg. You can use different colours to get a cool rainbow effect or just the one colour. (Make sure there is nothing important around you that the food colouring can be flicked onto!) Lay onto paper towel to dry.
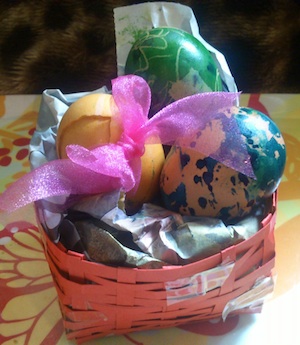
3. Rubber band/ribbon effect – Once egg is cool, tie rubber bands or ribbon securely around your egg in all different directions. Dip in dye and lay onto paper towel to dry. Once dry take off rubber bands – I will be honest and unfortunately this one didn’t work so well for me. I think using wider rubber bands would work a lot better otherwise the colouring can easily go underneath the band. So instead I had a fully one coloured egg which I wrapped with some nice ribbon.
Place them in a nice Easter basket filled with straw or tissue paper and you are set to go. Something for you and the kids to be very proud of.
 2) Chocolate filled Easter Eggs
These are a slightly different take on your traditional Easter eggs and also something that the whole family can get involved with. Get as creative as you like and people will be in awe of your beautiful yummy chocolate Easter eggs all hand made by YOU.
Materials:
Eggs (how ever many you wish to make)
Cake Skewer (or similar, to make one smallish hole in the egg)
Plastic cup or container for dyeing egg
Food Colouring
Dripping Tray
Paper Towels
Dairy Milk Chocolate (2 x Kingsize blocks filled 3 egg shells once melted)
Double boiler (or saucepan and small bowl to melt chocolate in)
Icing bag
Method:
Step 1 – Carefully make a small hole in the bottom of the egg (just one hole and make it about the size of your finger to not only make it easier to get the egg contents out but this way you can also have your finger in the hole to hold the egg whilst dipping in dye)
Step 2 – Empty out egg contents into bowl (maybe have scrambled eggs for lunch :)). Rinse the remaining egg shell out with warm water and place carefully in an oven on low heat for 20 – 30 minutes or until completely dry inside. Place dripping tray underneath eggs to collect any moisture

Step 4 – Get your next area ready for filling the eggs with chocolate as you won’t get this opportunity when you are holding onto the bowl with hot chocolate melting. Place your dried coloured egg shells into a egg carton hole side up, ready for the chocolate to be poured into. Have icing bag nearby or if you can, get someone to help you as the chocolate can be extremely hot and melted at one moment then cool and set quickly.

Step 6 – Pour hot chocolate into icing bag or even a gravy boat. Once you have collected all the melted chocolate, pour slowly into the egg shells. Tap them slightly now and then to get out any air bubbles. Once egg shell is full to the top, tap again and fill more.
Step 7 – Now all you need to do is refrigerate overnight until firmly set, then place in a nice Easter basket or bowl and be ready for the overwhelming compliments 🙂
 3) EASTER BASKETS
Now that you have all those flash coloured and chocolate filled Easter eggs you need somewhere pretty to display them, and what better way to display them than in an Easter basket handmade by you and your children?! Pretty easy baskets here but the first option can be a bit fiddly and time consuming but looks great. So have a go and just take your time.
Woven Easter Basket
Materials:
5 Inch x 14 inch card (not too thick as you will be weaving it a lot)
Ruler
Pencil
Paper cutter/guillotine or scissors (guillotine just makes the lines a bit straighter)
Cellotape
Method:

Step 2: Grab 5 of these 1/4 inch strips and put the others aside for later. On a table or clear space, measure out 3 inches. Spread the 5 strips parallel to each other and evenly along the 3 inches, tape down.
Step 3: Find the middle of the third strip length wise, so about 7 inches down and mark a dot. This is where you should line up you next 5 strips so they are evenly spaced (Step 4).

Step 5: At this point you should have 10 strips, weaved though each other to make the base of a box. Outside of the weaved area should be approximately 5.5 Inches of strip length.

Simple Square Easter Basket
Materials:
9 cm x 9.5 cm piece of card
Cello tape
Pencil
Scissors
Measuring Tape
Method:

Step 2: Draw a line from each dot to dot at opposite ends of card – one straight line. Do this for both edges, so you end up with 8 straight lines (incl. lines created by end of card)
Step 3: You are going to be focusing on the 2 middle lines of each edge. These will make up the panels. What you need to do now, is have the card on the 9cm edge at the top. The corner lines of each side need to be cut out and therefore will leave you with 5 square shaped boxes. The middle one is the base of your box and the remaining ones are the sides.

You can tie each basket with some ribbon and/or add some cellophane or tissue paper inside the basket to fill it in a bit and have a nice soft place for your eggs to be placed into. All finished and ready to hold your gorgeous Easter eggs 🙂
I’d love to hear your Easter crafts for kids as well! Let me know what you and your family have been making and how it turns out!


