
Children love to play with clay, and there are some great craft projects that kids can make. Read here about types of clay, and ideas for clay creations.
Playing with clay is such a fun part of being a child, and there are so many different projects that they can do. Before they start, it is important to get the right sort of clay – so here are some basic guidelines to point you in the right direction.
Types of Clay
Air Dry Clay
When it comes to clay, you no longer need a giant kiln for your child to become a junior potter. Air dry clay can be purchased from art supply shops and educational toy stores, and as the name suggests, it simply air dries. Your child makes and models their chosen project, and after about 24 hours, the clay sets solid. Instead of glazing, your child then uses standard acrylic paints to decorate their piece.
Generally speaking, air dry clay can’t be used to make outdoor ornaments, as the rain and moisture re-softens the clay. However, things like mobiles and wind chimes are okay for months, provided they are hung under the eaves.
Potters Clay
Real potters clay is the best medium to use if you want a truly professional finish, or your child’s project is to be put outside. Potters clay is a little harder to track down than the air dry version, but schools and early childhood centres may be willing to order a bag on your behalf.
Once they have made their clay creation, you will need to get your child’s work fired – especially if it is being put outside. Some schools will hire out their kiln, or your local pottery club may have members who will let you use theirs. Be aware that you will probably have to pay for a complete firing, as potters will be reluctant to share the kiln with a child’s work. No it’s not snobbery – pottery can explode for lots of reasons (including air bubbles in the project) and if it does, it usually smashes everything else along with it.
Polymer Modelling Clay
Polymer clay is coloured clay that looks a bit like plasticine. It can be moulded and blended together, and then baked in your kitchen oven to harden. It costs about $5 for a block about the size of a business card, so it is best used for small projects.
Each brand has slightly different instructions as to how it’s used, so make sure you read the back of the pack before you start.
Child’s Birthday gift? Find a great selection of popular Books & Authors.Age: 0 1 2 3 4 5 6 7 8 9 10 11 12 Years Old |
||||
|
|
|
|
|
|


Project Ideas
There are literally thousands of things your child can make with clay, and the more they play, the more ideas they will get. To begin with, let them make and model using just their hands, and then you can start introducing all sorts of tools and materials for creating texture and design. Here are some great clay projects to get you started.
Pinch Pots
Simple pinch pots are made by rolling clay into a ball, and then pinching a hole into the top. Your child slowly pinches and pulls at the hole until it becomes big enough to use as a bowl. They can keep the sides of the bowl as thick or as thin as they like, and can make the hole or bowl as deep as they choose also. Once the bowl has been created they can scratch designs into the side, or add extra clay for a 3D effect.
There are plenty of things you can use pinch pots for. Favourite pinch pots in our house are used for loose change, car keys or the tooth fairy.
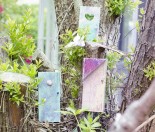
Wind Chimes
Both air dry and potters clay can be used to make great wind chimes. Simply roll out the clay to about 5mm thick, and then cut it into finger sized strips or use a cookie cutter to make interesting shapes. Scratch in a design, or use scrap clay to make 3D patterns on each piece. Poke a pencil or paintbrush through the top of each piece to make a hole, and then set it aside to dry.
Once the pieces are completely dry (or fired), thread twine through the hole in each piece and attach the other end to a hanger. You can either make a clay hanger in the same way as you have made the pieces (but with more holes), or use any of the hanger ideas in our Making Mobiles article.
Cell Phone Holder
Older kids will enjoy making a cradle for their cell phone. There are no specific instructions for how this should be done – just lots of modelling, pulling and prodding until they get the shape just right. If they are using air dry or polymer clay, they can press beads and gemstones into the clay before it dries. This will give them a cell phone cradle with real ‘bling’ factor.
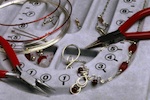
Clay Beads
Polymer clay is great for making beads, especially if you have a good range of colours.
To make beads, simply roll your clay into a long sausage shape and then slice it into varying sized pieces. With each piece, poke a wooden skewer through from one side to the other, and gently mould and shape the piece to form your bead. Finally, jiggle the skewer to make the hole the right size, and then gently remove it from the bead.
You can make the beads single colours, or roll out several colours together to get a blended ‘sausage’. Once your child gets the hang of making a basic bead, there are lots of tricks and techniques they can learn to make very intricate designs.
Clay play is only limited by your imagination, and the more you let your child explore and experiment, the more amazing things they will create – plates, dishes, bowls, models, tooth pick holders, toothbrush holders, key rings, treasure boxes…..the sky is the limit. Have fun!


Amazing ideas! Thank you for sharing this. Awesome and perfect for the kids! I really loved the materials you put to complete the features of this collection. We did Toothpick Porcupines out of the same materials you used. You should check it out! 🙂
EarlyLearning.Momtrusted.com: Toothpick Porcupines