I don’t know about you, but I’m constantly looking for ways to store all my children’s toys. Luckily for me my husband is a hobby beer brewer, and beer crates are great storage solutions. Find out about how to make an upcycled beer crate toy box.
Over the last couple of years my husband and I have been creating different storage systems in the hopes of creating some sort of order to our living areas!
We built a window seat with storage underneath. Then we created a writing and art corner for our little ones to keep all their arts and crafts supplies.
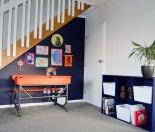
But I really needed some storage for my little boy’s room (which has been a little neglected, I have to say). I think it’s about time I put some love and light into this part of the house. So step one is to create some storage toy boxes to get some of his books and toys off the floor. I decided to try making these out of old beer crates.

I love the idea of upcycling these beer crates. They’re strong and sturdy, don’t create plastic waste in the environment like many toy boxes, and paint up really well.
I decided to go super bright and went with Resene Wild Thing. It’s a gorgeous bright yellow that we used in our last project when we made a DIY pallet coffee table. I just love this colour! And the Enamacryl is really hard wearing, and cleans off great, which is ideal for our 2 year old’s ‘artistic’ endeavours.

Upcycled beer crate toy box
What you need
A wooden beer crate (the classic ABC crates cost around $10 from liquor stores, but ask them if they have any free spares first)
A paint brush
Resene Quick Dry waterborne primer undercoat
Resene Enamacryl Wild Thing
Sandpaper
Decals (optional, you can source these from places like Kmart)
4 castor wheels (we purchased ours from an emporium for $1 each, but you could always recycle wheels from an old office chair)
Small screws
What to do
1. Start by making good the wooden crate. You can fill the nail holes and any large cracks (although I choose not to). And give the whole box a good sand, especially the edges and corners.
2. Paint a coat of primer over the whole box. Once that is dry give your storage box a light sand.
3. Now apply your first coat of Resene Wild Thing. You’ll need to apply 3 coats to your box in order to achieve the richest colour. Make sure you let every coat dry thoroughly in between.
4. Turn your box upside down and screw your wheels to the bottom.
4. If you chose to add decals, put them on now. You might like to get your kids to choose their favourite decal, or embellishment.
That’s how to make an upcycled beer crate toy box. Now just fill with toys, books and other bits of kid stuff, and watch your little one happily push their new toy box around their room!